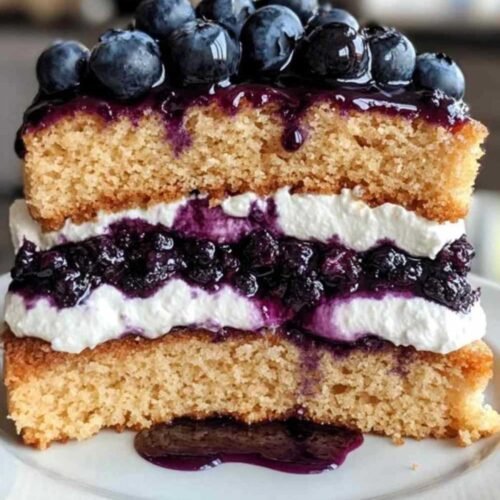
Gâteau aux Myrtilles et Crème Fraîche
I stumbled upon this blueberry cake recipe last summer when I was looking for something special to serve at our family reunion. The combination of tender vanilla cake layers with stabilized whipped cream and the most incredible fresh blueberry sauce creates this showstopper that tastes like it came from a fancy patisserie. My husband, who normally passes on cake to save room for pie, ate two slices before anyone else had even been served!
Equipment
- Two 8-inch round cake pans
- parchment paper
- stand mixer or hand mixer
- Large mixing bowls
- saucepan
- Wire cooling rack
- Cake stand or serving plate
- Spatula
Ingrédients
- 250 g All-purpose flour Sifted for the lightest texture
- 200 g Granulated sugar The perfect sweetness for balancing the tart blueberries
- 1 tablespoon Baking powder For proper rise
- 1/2 teaspoon Salt Enhances all the flavors
- 120 g Unsalted butter At room temperature for proper creaming
- 240 ml Milk Whole milk gives the richest flavor
- 3 large Eggs Room temperature for best incorporation
- 1 teaspoon Vanilla extract Pure vanilla, not imitation, makes all the difference
- 500 ml Heavy cream The higher the fat content, the better it will whip
- 50 g Powdered sugar For sweetening the whipped cream
- 1 teaspoon Vanilla extract For flavoring the cream
- 1 tablespoon Powdered gelatin This stabilizes the whipped cream so it won't weep
- 2 tablespoons Cold water For blooming the gelatin
- 300 g Fresh blueberries The star of the show - use the plumpest ones you can find
- 100 g Granulated sugar For the blueberry sauce
- 1 tablespoon Lemon juice Brightens the blueberry flavor
- 1 tablespoon Water For the blueberry sauce
- 1 cup Fresh blueberries For decorating the top - optional but so pretty
Instructions
- Preheat your oven to 350°F (180°C). I've learned the hard way that an oven thermometer really helps ensure proper temperature - mine runs about 15 degrees cool!
- Butter two 8-inch (20cm) round cake pans and line the bottoms with parchment paper. This double insurance against sticking has saved me countless times.
- In a large bowl, sift together the flour, baking powder, and salt. Don't skip the sifting - it creates those tiny air pockets that make the cake texture so divine.
- In another bowl, beat the butter and sugar until the mixture is light and fluffy, about 3-4 minutes. The first time I made this, I rushed this step and ended up with a denser cake. The transformation when you properly cream butter and sugar is magical!
- Add the eggs one at a time, mixing well after each addition. Add the vanilla extract and mix until combined.
- Gradually add the flour mixture and milk to the creamed mixture, alternating between the two and beginning and ending with the flour. I usually do flour-milk-flour-milk-flour in five additions.
- Divide the batter evenly between the prepared pans. I actually weigh mine to ensure they're identical - they're usually about 500g each.
- Bake for 25-30 minutes, or until a toothpick inserted into the center comes out clean. In my oven, this is exactly 28 minutes, but yours may vary!
- Allow the cakes to cool in the pans for 10 minutes, then remove from pans and transfer to a wire rack to cool completely. If the cakes have domed tops, you can level them with a serrated knife once cool.
- For the stabilized whipped cream: In a small bowl, mix the gelatin with cold water and let it stand for 5 minutes until it blooms (gets all soft and jelly-like).
- After the gelatin has bloomed, microwave it for about 10 seconds until it's completely dissolved. Be careful not to overheat! Set aside to cool slightly but not set.
- In a large bowl, beat the heavy cream until it begins to thicken. Add the powdered sugar and vanilla extract, then continue beating until firm peaks start to form.
- With the mixer running on low, slowly pour in the dissolved gelatin mixture. Continue beating until stiff peaks form. The gelatin is my secret weapon for a whipped cream that stays perfect even after hours at room temperature!
- For the blueberry sauce: In a small saucepan, combine the blueberries, sugar, lemon juice, and water. Heat over medium heat until the blueberries begin to burst and the mixture thickens slightly, about 5-7 minutes. My neighbor stopped by just as this was simmering, and the aroma alone convinced her to stay for coffee!
- Remove from heat and allow to cool completely. The sauce will continue to thicken as it cools.
- To assemble the cake: Place one cake layer on a serving plate. Spread a generous layer of the stabilized whipped cream on top, leaving about a 1/2 inch border (it will spread with the weight of the top layer).
- Spoon about half of the blueberry sauce over the whipped cream. My daughter has started helping me with this step, carefully drizzling the blueberry sauce in a pattern that's as unique as she is.
- Place the second cake layer on top and cover with the remaining whipped cream, spreading it over the top and sides if desired.
- Pour the remaining blueberry sauce over the top of the cake, allowing some to drip attractively down the sides. There's something magical about the way those purple-blue rivulets create such a dramatic effect with so little effort!
- If desired, decorate with fresh blueberries around the edge or scattered across the top.
- Refrigerate the cake for at least 1 hour before serving to allow all the flavors to meld together. This also makes it much easier to get clean slices.
Notes
This cake is best enjoyed within 2 days. Store any leftovers in the refrigerator, but I've found bringing it to room temperature about 20 minutes before serving gives the best flavor and texture. If blueberries aren't in season, you can use frozen ones for the sauce - just don't thaw them first! For a breakfast version, try making this with a streusel topping instead of the whipped cream for a blueberry coffee cake variation that's absolutely heavenly with morning coffee.